Allows you to manage studies and documents.
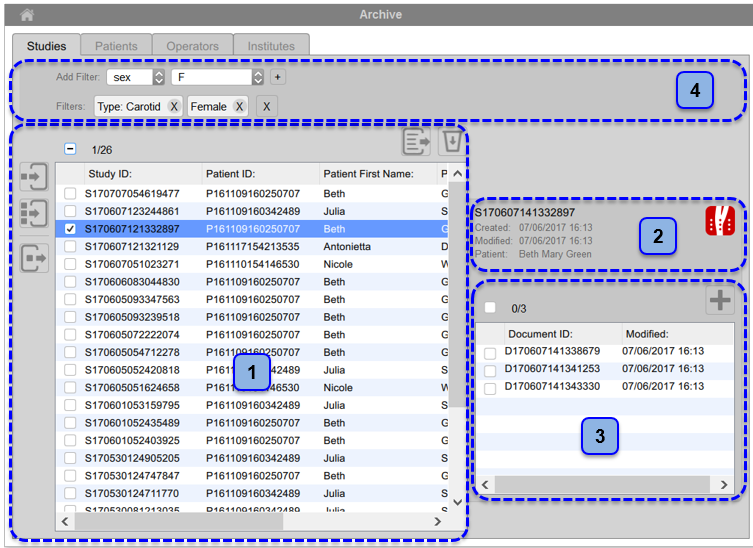
The study list is given in the table (1). Once you select one of the studies, the study details are shown in the frame (2). The first value in this frame is the study identification number (study ID).
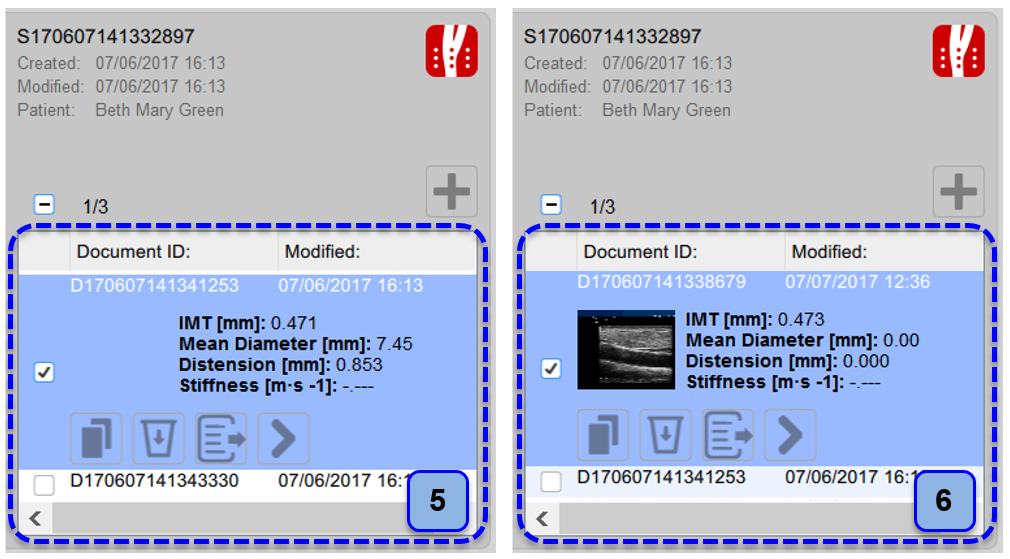
The documents included in the selected study are shown in the table (3) and with a single click on an item the document preview is shown (5)(6).
In the frame (4) you can add and remove filters to the study list. The following filter can be used:
In addition, you can filter the studies by patient by going to the Patient management panel and double clicking on the patient.
Management of Studies Table
Import a study:
- Click on the Import Study
 button that is placed on the left of the Studies Table (1).
- Select the folder that contains the study to be imported, then press Select Folder.
Import more than one study:
- Click on the Multiple Import Study
 button that is placed on the left of the Studies Table (1).
- Select the folder that contains the studies to be imported, then press Select Folder.
Export a study:
- In table (1), click on the study to be exported.
- Click on the Export Study
 button that is placed on the left of the Studies Table (1).
- Select the destination path where you want to save your exported study, then press Save.
Delete a study:
- In table (1), click on the study to be deleted.
- Click on the Delete Study
 button that is placed above the Studies Table, on the right (1).
Multiple selection:
In Studies Table multi-select feature is available. You can select more than one study and perform export and delete operation on selected studies.
In table (1), select the studies through the check-box. The label over the table shows how many studies are selected from the available ones.
After you have selected studies you can export them (clicking on multiple Export  button, placed on the left of the Studies Table) or delete them (clicking on multiple Delete button, placed above the Studies Table, on the right) (1).
Advanced export:
It is possible to export documents of selected study/studies as CSV, TSV or PDF file.
- In table (1), click on the study/studies to be exported
- Click on the Export Documents
 button that is placed on the top of Studies Table (1). A drop-down menu appears:
- Export Document Results: it exports a TSV/CSV file containing information about the study, the document and the computed results. You can export also a PDF report of the document.
- Export Document Data: it exports a TSV/CSV file containing the results of the study and the instantaneous data.
- Export Aggregated Results: it is also possible to export aggregated results of different study documents in a single CSV or TSV file (please note that selected studies should all be of the same type, e.g. Carotid, FMD or Vasodilation).
- Select the destination path where you want to save your exported documents, then press Save.
Management of Documents Table
To perform any operation on a document, you have to select first a study in Studies Table (1)
Document preview:
Once you have selected a study in Studies Table (1), in Documents Table (3) the list of documents appears (if at least one document exists).
With a single click on a document it will be possible to show its preview (5)(6), that is made up by:
- Image: by default it is empty and the user can set one of the frames of the video clip as image preview. In order to do this, open an existing document (or at the end of the analysis, during the review) and perform a right click on the video player once the desired frame is displayed. Then,click on the menu item "Set this image as preview"
- Text: it shows a short preview of the document with the values (if calculated) of the characteristic parameters for that study type
Open a document:
- Click on the document to be open.
- Click on the Go
 button in document preview (5) and the document will open in the application that created it or,
- Double click on the document to be open.
- The document will open in the application that created it
Duplicate a document:
- In table (5), click on the document to be duplicated.
- Click on the Duplicate Document
 button in the document preview.
Delete a document:
- In table (5), click on the document to be deleted.
- Click on the Delete Document button in the document preview.
Export a document:
- In table (5), click on the document to be exported (PDF report).
- Click on the Export Document button in the document preview.
Create a new document:
- Click on the Create New Document
 button that is inside the document whose video/image source is to be re-analysed.
- The application that created the document will open. You can analyse again the data and create a new document.
Multiple selection:
In Documents Table multi-select feature is available. You can select more than one document and perform export and delete operation on selected documents.
In table (5), select the documents through the check-box. The label over the table shows how many documents are selected from the available ones.
After you have selected documents you can export them (clicking on multiple Export button) or delete them (clicking on multiple Delete button) (5).
Advanced export:
It is possible to export documents of selected study/studies as CSV, TSV or PDF file.
- In table (5), click on the study/studies to be exported
- Click on the Export Documents button that is placed on the top of Documents Table (5). A drop-down menu appears:
- Export Document Results: it exports a TSV/CSV file containing information about the study, the document and the computed results. You can export also a PDF report of the document.
- Export Document Data: it exports a TSV/CSV file containing the results of the study and the instantaneous data.
- Export Aggregated Results: it is also possible to export aggregated results of different study documents in a single CSV or TSV file (please note that selected studies should all be of the same type, e.g. Carotid, FMD or Vasodilation).
- Select the destination path where you want to save your exported documents, then press Save.