Calibrate the B-mode image
The calibration of the images must be done before starting a new examination because it is necessary to provide information about the size of the image generated by ultrasound system. The calibration factor changes depending on the settings of your ultrasound machine. You should check the calibration at each new examination.
CAUTION: the lack of calibration can generate a software malfunction.
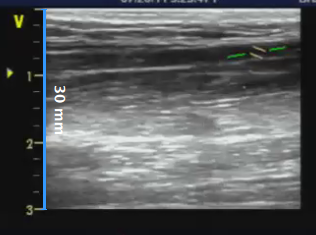
Locate, in ultrasound image, a range of known distance (30 mm. in the example of figure).
In the B-mode setup panel, select from the drop-down menu, the distance specified above.
In the B-mode setup panel, click on the Set B-Mode Calibration
 button (button remains active).
Draw a line on the image corresponding to the known distance: click on one end and drag the mouse to the other extreme (press the Shift key or Ctrl+Shift keys on your keyboard if you want the line to be not vertical or horizontal).
For DICOM files, when present, the B-mode calibration is be obtained automatically by the file metadata (see Settings). You can anyhow modify the calibration value.
You can directly type the calibration value in the Calibration factor field of the B-mode setup panel, if you already know the value.